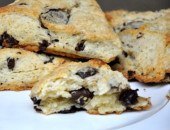
Chocolate Chip Scones

A few years ago I borrowed Rose Levy Beranbaum’s The Bread Bible from a friend, and I quickly came to the conclusion that although I valued our friendship, I would not be returning the cookbook.
The original recipe for “Flaky Scones,” one of the book’s standouts, calls for currants. I didn’t have currants or other dried fruit handy the first time I made them, so I decided to substitute with what I did have in the pantry: several bars of quality chocolate. From the oven, the scones emerged golden on top and moist underneath, oozing with chocolate between flaky, buttery layers. They were, most certainly, no ordinary scones, and my husband and I ate that first batch within 24 hours.
The genius of the recipe lies in the technique – folding and rolling the dough – which is responsible for creating all of those delicious layers.
Yield: approximately one dozen
Chocolate Chip Scones
Ingredients:
1 cup unsalted butter, cold
4 1/4 cups unbleached, all-purpose flour
1/2 cup sugar
2 teaspoons baking powder
1/2 teaspoon baking soda
1/4 teaspoon salt
2 cups heavy cream + extra for brushing
6 oz semi-sweet chocolate, coarsely chopped
Coarse or raw sugar
Directions:
Equipment:
You’ll need two baking pans lined with parchment or non-stick liners as well as a baking stone or a baking sheet.
Instructions:
- Preheat the oven to 400F approximately 30 minutes before baking. Place the baking stone or baking sheet on the middle rack before preheating.
- Cut the butter into 1-inch cubes and refrigerate for at least 30 minutes, or freeze for 10 minutes.
- In a large bowl or the bowl of an electric mixer, whisk together the flour, sugar, baking powder, baking soda, and salt. Add the butter and mix on low until the pieces have reduced to the size of small walnuts – approximately 4 minutes. If you don’t have an electric mixer, press the cubes into large flakes with your fingers.
- Stir in cream and chocolate by hand until flour is moistened and dough starts to come together. Knead the dough in the bowl just until it holds together, and turn it out onto a lightly floured board. (I find it it sometimes easier to work the dough together on the board.)
- Lightly flour the top of the dough, and roll it out into a long rectangle 1-inch thick and about 8-inches by 12-inches. Fold the dough in thirds as if you’re folding a letter, lightly flour again, and rotate the dough so that the closed side faces to the left. Roll it out again and repeat the “turn” five more times.
- Cut the dough in half lengthwise so you have two pieces, each about 4-inches by 12-inches. Brush the tops of the scones lightly with cream and sprinkle with coarse sugar. Cut each piece of dough into triangles with a 3-inch base and place them 1-inch apart on the prepared baking sheets. If the dough is soft, cover it with plastic wrap and freeze for 15 minutes or refrigerate for an hour before baking.
- Bake the scones one sheet at a time. Refrigerate the second sheet while you bake the first one, then bake the second pan directly from the fridge. Place the pan on the hot baking stone or hot baking sheet and bake for 15 to 20 minutes or until the edges begin to brown and the tops are golden brown. Do not over bake, as they continue baking slightly on removal from the oven and are best when slightly moist and soft inside.
NOTE: Rose recommends the following method (in italics below) for cooling. However, the scones disappear so quickly in our house that we rarely fool with this step.
Place two linen or cotton towels on two large racks and, using a spatula, set each scone on the racks. Fold the towels over loosely and allow the scones to cool until warm or at room temperature. Since linen or cotton “breathes,” the scones will have enough protection to keep from becoming dry and hard on the surface but will not become soggy.
Adapted from The Bread Bible by Rose Levy Beranbaum